Rediscovering the Joy of Cooking

October 29, 2009

Cheesy Creamed Corn

Filed under: lamb, side dish, vegetables — Emily @ 7:48 pm

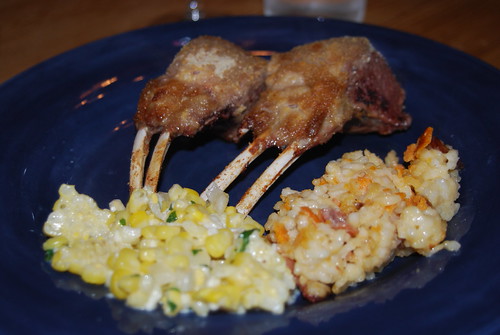
My husband is a huge fan of lamb. For our first night spent in Michigan with my parents, we had a delicious lamb dish along with some really great and easy side dishes.

Cheesy Creamed Corn

3 tablespoons butter

1 1/2 cups chopped scallions (roughly 6 scallions)

12 ears corn (cut from cob)

2/3 cups cream

2 teaspoons cornstarch

1 large garlic clove

6 ounces queso fresca

1/2 cup cilantro

Cook together the butter and scallions for several minutes. Combine the scallions with the corn, cream, cornstarch and garlic clove in a large bowl. Top with queso fresca and cilantro.

Source: Food and Wine Magazine

October 15, 2009

Garlic Pilaf

Filed under: rice, side dish, Uncategorized, vegetarian — Emily @ 8:02 am

This is a great side dish that is quick to throw together and goes with most entrees.  I am notorious for putting all my effort into the main dish and neglecting sides. While this takes a few extra minutes, most of the time is down time, so you can put everything together and then focus on the main dish. It is definitely worth it! I recently had this with one of our favorite easy and quick dishes, Laughing Cow Chicken–which I will share soon!

Baked Garlic Rice Pilaf

2 Tbsp. butter

3 cloves garlic, minced or pressed

1 cup long-grain white rice

2 1/2 cups chicken broth, divided

1/2 tsp. salt

1/2 tsp. pepper

Squeeze of lemon juice


Preheat the oven to 375° F.  Have ready a covered casserole dish.

In a saucepan or skillet, melt the butter over medium-high heat.  Add the garlic and rice to the pan and cook until both are golden brown, about 3-4 minutes.  Stir in 1 cup of the chicken broth and bring to a boil.

Pour the mixture into the casserole dish, cover, and bake for 25 minutes.  Stir in the remaining 1½ cups chicken broth and bake, covered, for another 45 minutes.  About 15 minutes before it is finished baking, stir in a squeeze of fresh lemon juice.

Note: This recipe can be doubled without increasing the baking time.

Source: Annie’s Eats

October 13, 2009

Sweet-and-Sour Brisket

Filed under: beef, freezer, main dish, make ahead — Emily @ 8:48 am

This brisket is unbelievable. My husband actually said “this is the best meat dish I’ve ever eaten…” and yet, it is very easy to throw together. It is best if you make it a day or two in advance and let it marinate for awhile—it just continues to get better and better. After eating it for a day or two, buy some big, crusty sandwich rolls and enjoy it with a side of jus. Since it’s essentially just slabs of meat, the picture really doesn’t do it justice. But I promise, you will not regret making this dish.

Sweet-and-Sour Brisket

1/2 cup red wine

1 can (14 ounces) low-sodium beef broth

3/4 cup chili sauce, such as Heinz

1/4 cup apple cider vinegar

1/4 cup firmly packed light brown sugar

1/2 teaspoon dried thyme

1 bay leaf

1 brisket (about 5 pounds)

Kosher salt and freshly ground pepper

2 tablespoons vegetable oil

4 medium yellow onions, cut into 1/2-inch thick slices

Preheat the oven to 350 degrees F.

To make the sweet-and-sour sauce:

Combine the wine, broth, chili sauce, vinegar, brown sugar, thyme, and bay leaf in a medium bowl. Set aside.

To prepare the brisket:

Season the brisket on both sides with kosher salt and pepper to taste. Heat 1 tablespoon of the oil in a 6-quart pot or Dutch oven over medium-high heat. When the oil is hot, add the brisket, fat-side down, and cook until golden brown, about 4 minutes. Turn the brisket over and cook until browned, 3 to 4 minutes more. Transfer to a plate. Add the remaining 1 tablespoon oil to the pot. Add the onions and cook, stirring occasionally, until they begin to caramelize, about 5 minutes. Place the brisket on top of the onions and cover with the sauce.

Cover the pot, place in the oven, and bake for 1 1/2 hours. Transfer the brisket to a cutting board, scrape off the excess fat, and cut across the grain of the meat into 1/8-1/4-inch-thick slices. Return the slices to the pot, overlapping them. Spoon the sauce over the brisket, covering the meat well. Bake until the meat is fork tender, 1 1/2 to 2 hours more.

For the best flavor, let the brisket cool, then cover and refrigerate overnight. When ready to serve, preheat the oven to 350 degrees F. Put the brisket in a large pot and smother with the sweet-and-sour sauce to enhance the flavor and preserve moistness. Cover and bake for 20 to 30 minutes.

Tip: This brisket freezes beautifully. Because the flavors get better over time, we refrigerate the brisket for a day or two before freezing (if you can resist eating it!) Thaw the brisket before reheating it.

Source: Bride and Groom First and Forever
October 11, 2009

Easy Appetizer: Chili Cream Cheese Dip

Filed under: appetizers, beef, dips — Emily @ 8:00 am

This easy dip takes about 5 minute from start to finish to put together. It has 3 ingredients and is really delicious–perfect for throwing together a quick appetizer for impromptu guests or to bring to a sporting event.  All you need is a microwave!

Chili Cream Cheese Dip

1 package of cream cheese (nonfat or regular), at room temp

1 can of chili with beans (or homemade chili)

1/2 package of mild Cheddar or Mexican blend cheese

Spread the cream cheese on the bottom of a microwave-safe dish. Pour the chili over the cream cheese and sprinkle the cheese on top. Heat in the microwave for approximately 3-5 minutes (varies depending on your microwave). Alternatively, you can heat in the oven. Just looking to heat and melt the cheese on top.

Serve with tortilla chips.

Source: my mom

October 10, 2009

Meatballs with Sour Cream and Mushrooms

Filed under: appetizers, beef, make ahead — Emily @ 11:28 am

This is a really unique recipe for meatballs. I’ve never had them before with this combination of flavors. And they definitely work! You can make these ahead of time and keep them warm in the crockpot, which is what I did. The picture isn’t the greatest. I made these for a football party and didn’t really have time to take a good picture. You can also make these into delicious meatball sandwiches!

Meatballs with Sour Cream and Mushrooms

1 can cream of mushroom soup

1 cup sour cream

1/2 cup white wine and/or low-sodium chicken broth

1-2 gloves chopped garlic

handful of dried mushrooms, crumbled and sprinkled

a few tablespoons fresh chopped parsley

fresh chopped dill, to taste

salt and pepper, to taste

2 pounds meatballs

Mix all the ingredients together except the meatballs to make the sauce.

Brown the meatballs in a large saute pan over medium heat. Add the sauce to the meatballs (either in the pan or in a crock pot) and heat the sauce.

Source: my mom’s friend

October 1, 2009

Spaghetti with Beef and Mushroom Sauce

Filed under: beef, freezer, main dish, pasta — Emily @ 9:52 am

This dish was definitely comfort food! It was creamy and delicious–and very easy to throw together quickly.

Spaghetti with Beef and Mushroom Sauce

  • 1 lb ground beef
  • 1/2 c. chopped onion
  • 1 (10 3/4 oz.) can condensed cream of mushroom soup
  • 1 (10 3/4 oz.) can condensed tomato soup
  • 1 (4 oz.) can sliced mushrooms
  • 1/2 t. dried Italian seasoning, crushed
  • 1/2 t. chili powder
  • 1/4 t. black pepper
  • 12 oz. dried spaghetti
  • Grated Parmesan Cheese

In a large saucepan or a dutch oven cook ground beef and onion until meat is brown and onion is tender. Drain. Stir in msuhroom soup, tomato soup, mushrooms, seasonings. Bring sauce to boiling; reduce heat. Simmer covered, for 20 minutes stirring occasionally.

Meanwhile, cook spaghetti according to package directions. Drain. Serve sauce over hot spaghetti. If desired, sprinkle each serving with Parmesan cheese.

Source: Carrie’s Sweet Life (originally from Better Homes and Gardens)

Create a free website or blog at WordPress.com.